Exercise 2: Index Films Data
Exercise 2: Modify the Schema and Index Films Data
This exercise will build on the last one and introduce you to the index schema and Solr’s powerful faceting features.
Restart Solr
Did you stop Solr after the last exercise? No? Then go ahead to the next section.
If you did, though, and need to restart Solr, issue these commands:
./bin/solr start -c -p 8983 -s example/cloud/node1/solrThis starts the first node. When it’s done start the second node, and tell it how to connect to to ZooKeeper:
./bin/solr start -c -p 7574 -s example/cloud/node2/solr -z localhost:9983
If you have defined ZK_HOST in solr.in.sh/solr.in.cmd (see Updating Solr Include Files) you can omit -z <zk host string> from the above command.
|
Create a New Collection
We’re going to use a whole new data set in this exercise, so it would be better to have a new collection instead of trying to reuse the one we had before.
One reason for this is we’re going to use a feature in Solr called "field guessing", where Solr attempts to guess what type of data is in a field while it’s indexing it. It also automatically creates new fields in the schema for new fields that appear in incoming documents. This mode is called "Schemaless". We’ll see the benefits and limitations of this approach to help you decide how and where to use it in your real application.
When you initially started Solr in the first exercise, we had a choice of a configset to use. The one we chose had a schema that was pre-defined for the data we later indexed. This time, we’re going to use a configset that has a very minimal schema and let Solr figure out from the data what fields to add.
The data you’re going to index is related to movies, so start by creating a collection named "films" that uses the _default configset:
bin/solr create -c films -s 2 -rf 2Whoa, wait.
We didn’t specify a configset!
That’s fine, the _default is appropriately named, since it’s the default and is used if you don’t specify one at all.
We did, however, set two parameters -s and -rf.
Those are the number of shards to split the collection across (2) and how many replicas to create (2).
This is equivalent to the options we had during the interactive example from the first exercise.
You should see output like:
WARNING: Using _default configset. Data driven schema functionality is enabled by default, which is
         NOT RECOMMENDED for production use.

         To turn it off:
            bin/solr config -c films -p 7574 -action set-user-property -property update.autoCreateFields -value false

Connecting to ZooKeeper at localhost:9983 ...
INFO  - 2017-07-27 15:07:46.191; org.apache.solr.client.solrj.impl.ZkClientClusterStateProvider; Cluster at localhost:9983 ready
Uploading /9.1.1/server/solr/configsets/_default/conf for config films to ZooKeeper at localhost:9983

Creating new collection 'films' using command:
http://localhost:7574/solr/admin/collections?action=CREATE&name=films&numShards=2&replicationFactor=2&collection.configName=films

{
  "responseHeader":{
    "status":0,
    "QTime":3830},
  "success":{
    "192.168.0.110:8983_solr":{
      "responseHeader":{
        "status":0,
        "QTime":2076},
      "core":"films_shard2_replica_n1"},
    "192.168.0.110:7574_solr":{
      "responseHeader":{
        "status":0,
        "QTime":2494},
      "core":"films_shard1_replica_n2"}}}
The first thing the command printed was a warning about not using this configset in production. That’s due to some of the limitations we’ll cover shortly.
Otherwise, though, the collection should be created. If we go to the Admin UI at http://localhost:8983/solr/#/films/collection-overview we should see the overview screen.
Preparing Schemaless for the Films Data
There are two parallel things happening with the schema that comes with the _default configset.
First, we are using a "managed schema", which is configured to only be modified by Solr’s Schema API. That means we should not hand-edit it so there isn’t confusion about which edits come from which source. Solr’s Schema API allows us to make changes to fields, field types, and other types of schema rules.
Second, we are using "field guessing", which is configured in the solrconfig.xml file (and includes most of Solr’s various configuration settings).
Field guessing is designed to allow us to start using Solr without having to define all the fields we think will be in our documents before trying to index them.
This is why we call it "schemaless", because you can start quickly and let Solr create fields for you as it encounters them in documents.
Sounds great! Well, not really, there are limitations. It’s a bit brute force, and if it guesses wrong, you can’t change much about a field after data has been indexed without having to reindex. If we only have a few thousand documents that might not be bad, but if you have millions and millions of documents, or, worse, don’t have access to the original data anymore, this can be a real problem.
For these reasons, the Solr community does not recommend going to production without a schema that you have defined yourself. By this we mean that the schemaless features are fine to start with, but you should still always make sure your schema matches your expectations for how you want your data indexed and how users are going to query it.
It is possible to mix schemaless features with a defined schema. Using the Schema API, you can define a few fields that you know you want to control, and let Solr guess others that are less important or which you are confident (through testing) will be guessed to your satisfaction. That’s what we’re going to do here.
Create the "names" Field
The films data we are going to index has a small number of fields for each movie: an ID, director name(s), film name, release date, and genre(s).
If you look at one of the files in example/films, you’ll see the first film is named .45, released in 2006.
As the first document in the dataset, Solr is going to guess the field type based on the data in the record.
If we go ahead and index this data, that first film name is going to indicate to Solr that the field type is a "float" numeric field, and will create a "name" field with a type FloatPointField.
All data after this record will be expected to be a float.
Well, that’s not going to work. We have titles like A Mighty Wind and Chicken Run, which are strings - decidedly not numeric and not floats. If we let Solr guess the "name" field is a float, what will happen is later titles will cause an error and indexing will fail. That’s not going to get us very far.
What we can do is set up the "name" field in Solr before we index the data to be sure Solr always interprets it as a string. At the command line, enter this curl command:
curl -X POST -H 'Content-type:application/json' --data-binary '{"add-field": {"name":"name", "type":"text_general", "multiValued":false, "stored":true}}' http://localhost:8983/solr/films/schemaThis command uses the Schema API to explicitly define a field named "name" that has the field type "text_general" (a text field). It will not be permitted to have multiple values, but it will be stored (meaning it can be retrieved by queries).
You can also use the Admin UI to create fields, but it offers a bit less control over the properties of your field. It will work for our case, though:

Create a "catchall" Copy Field
There’s one more change to make before we start indexing.
In the first exercise when we queried the documents we had indexed, we didn’t have to specify a field to search because the configuration we used was set up to copy fields into a text field, and that field was the default when no other field was defined in the query.
The configuration we’re using now doesn’t have that rule.
We would need to define a field to search for every query.
We can, however, set up a "catchall field" by defining a copy field that will take all data from all fields and index it into a field named _text_.
Let’s do that now.
You can use either the Admin UI or the Schema API for this.
At the command line, use the Schema API again to define a copy field:
curl -X POST -H 'Content-type:application/json' --data-binary '{"add-copy-field" : {"source":"*","dest":"_text_"}}' http://localhost:8983/solr/films/schemaIn the Admin UI, choose Add Copy Field, then fill out the source and destination for your field, as in this screenshot.
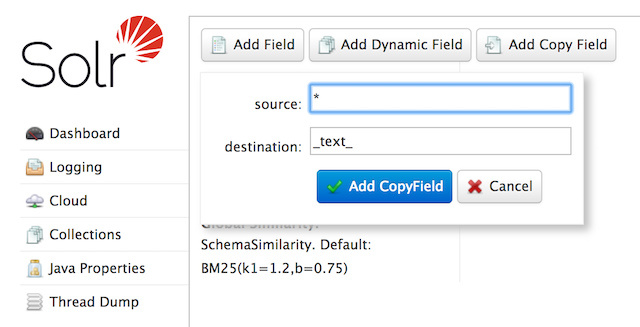
What this does is make a copy of all fields and put the data into the "_text_" field.
| It can be very expensive to do this with your production data because it tells Solr to effectively index everything twice. It will make indexing slower, and make your index larger. With your production data, you will want to be sure you only copy fields that really warrant it for your application. |
OK, now we’re ready to index the data and start playing around with it.
Index Sample Film Data
The films data we will index is located in the example/films directory of your installation.
It comes in three formats: JSON, XML and CSV.
Pick one of the formats and index it into the "films" collection (in each example, one command is for Unix/MacOS and the other is for Windows):
bin/post -c films example/films/films.json

C:\solr-9.1.1> java -jar -Dc=films -Dauto example\exampledocs\post.jar example\films\*.jsonbin/post -c films example/films/films.xml
C:\solr-9.1.1> java -jar -Dc=films -Dauto example\exampledocs\post.jar example\films\*.xmlbin/post -c films example/films/films.csv -params "f.genre.split=true&f.directed_by.split=true&f.genre.separator=|&f.directed_by.separator=|"
C:\solr-9.1.1> java -jar -Dc=films -Dparams=f.genre.split=true&f.directed_by.split=true&f.genre.separator=|&f.directed_by.separator=| -Dauto example\exampledocs\post.jar example\films\*.csvEach command includes these main parameters:
-
-c films: this is the Solr collection to index data to. -
example/films/films.json(orfilms.xmlorfilms.csv): this is the path to the data file to index. You could simply supply the directory where this file resides, but since you know the format you want to index, specifying the exact file for that format is more efficient.
Note the CSV command includes extra parameters.
This is to ensure multi-valued entries in the "genre" and "directed_by" columns are split by the pipe (|) character, used in this file as a separator.
Telling Solr to split these columns this way will ensure proper indexing of the data.
Each command will produce output similar to the below seen while indexing JSON:
$ ./bin/post -c films example/films/films.json
/bin/java -classpath /solr-9.1.1/server/solr-webapp/webapp/WEB-INF/lib/solr-core-9.1.1.jar -Dauto=yes -Dc=films -Ddata=files org.apache.solr.util.SimplePostTool example/films/films.json
SimplePostTool version 5.0.0
Posting files to [base] url http://localhost:8983/solr/films/update...
Entering auto mode. File endings considered are xml,json,jsonl,csv,pdf,doc,docx,ppt,pptx,xls,xlsx,odt,odp,ods,ott,otp,ots,rtf,htm,html,txt,log
POSTing file films.json (application/json) to [base]/json/docs
1 files indexed.
COMMITting Solr index changes to http://localhost:8983/solr/films/update...
Time spent: 0:00:00.878
Hooray!
If you go to the Query screen in the Admin UI for films (http://localhost:8983/solr/#/films/query) and hit Execute Query you should see 1100 results, with the first 10 returned to the screen.
Let’s do a query to see if the "catchall" field worked properly.
Enter "comedy" in the q box and hit Execute Query again.
You should see 417 results.
Feel free to play around with other searches before we move on to faceting.
Faceting
One of Solr’s most popular features is faceting. Faceting allows the search results to be arranged into subsets (or buckets, or categories), providing a count for each subset. There are several types of faceting: field values, numeric and date ranges, pivots (decision tree), and arbitrary query faceting.
Field Facets
In addition to providing search results, a Solr query can return the number of documents that contain each unique value in the whole result set.
On the Admin UI Query tab, if you check the facet checkbox, you’ll see a few facet-related options appear:
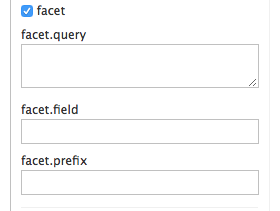
To see facet counts from all documents (q=*:*): turn on faceting (facet=true), and specify the field to facet on via the facet.field parameter.
If you only want facets, and no document contents, specify rows=0.
The curl command below will return facet counts for the genre_str field:
curl "http://localhost:8983/solr/films/select?q=*:*&rows=0&facet=true&facet.field=genre_str"
In your terminal, you’ll see something like:
{
  "responseHeader":{
    "zkConnected":true,
    "status":0,
    "QTime":11,
    "params":{
      "q":"*:*",
      "facet.field":"genre_str",
      "rows":"0",
      "facet":"true"}},
  "response":{"numFound":1100,"start":0,"maxScore":1.0,"docs":[]
  },
  "facet_counts":{
    "facet_queries":{},
    "facet_fields":{
      "genre_str":[
        "Drama",552,
        "Comedy",389,
        "Romance Film",270,
        "Thriller",259,
        "Action Film",196,
        "Crime Fiction",170,
        "World cinema",167]},
        "facet_ranges":{},
        "facet_intervals":{},
        "facet_heatmaps":{}}}
We’ve truncated the output here a little bit, but in the facet_counts section, you see by default you get a count of the number of documents using each genre for every genre in the index.
Solr has a parameter facet.mincount that you could use to limit the facets to only those that contain a certain number of documents (this parameter is not shown in the UI).
Or, perhaps you do want all the facets, and you’ll let your application’s front-end control how it’s displayed to users.
If you wanted to control the number of items in a bucket, you could do something like this:
curl "http://localhost:8983/solr/films/select?=&q=\*:*&facet.field=genre_str&facet.mincount=200&facet=on&rows=0"You should only see 4 facets returned.
There are a great deal of other parameters available to help you control how Solr constructs the facets and facet lists. We’ll cover some of them in this exercise, but you can also see the section Faceting for more detail.
Range Facets
For numerics or dates, it’s often desirable to partition the facet counts into ranges rather than discrete values.
A prime example of numeric range faceting, using the example techproducts data from our previous exercise, is price.
The films data includes the release date for films, and we could use that to create date range facets, which are another common use for range facets.
The Solr Admin UI doesn’t yet support range facet options, so you will need to use curl or similar command line tool for the following examples.
If we construct a query that looks like this:
curl 'http://localhost:8983/solr/films/select?q=*:*&rows=0'\
'&facet=true'\
'&facet.range=initial_release_date'\
'&facet.range.start=NOW/YEAR-25YEAR'\
'&facet.range.end=NOW'\
'&facet.range.gap=%2B1YEAR'
This will request all films and ask for them to be grouped by year starting with 25 years ago (our earliest release date is in 2000) and ending today.
Note that this query again URL encodes a + as %2B.
In the terminal you will see:
{
  "responseHeader":{
    "zkConnected":true,
    "status":0,
    "QTime":8,
    "params":{
      "facet.range":"initial_release_date",
      "facet.limit":"300",
      "q":"*:*",
      "facet.range.gap":"+1YEAR",
      "rows":"0",
      "facet":"on",
      "facet.range.start":"NOW-25YEAR",
      "facet.range.end":"NOW"}},
  "response":{"numFound":1100,"start":0,"maxScore":1.0,"docs":[]
  },
  "facet_counts":{
    "facet_queries":{},
    "facet_fields":{},
    "facet_ranges":{
      "initial_release_date":{
        "counts":[
          "1997-01-01T00:00:00Z",0,
          "1998-01-01T00:00:00Z",0,
          "1999-01-01T00:00:00Z",0,
          "2000-01-01T00:00:00Z",80,
          "2001-01-01T00:00:00Z",94,
          "2002-01-01T00:00:00Z",112,
          "2003-01-01T00:00:00Z",125,
          "2004-01-01T00:00:00Z",166,
          "2005-01-01T00:00:00Z",167,
          "2006-01-01T00:00:00Z",173,
          "2007-01-01T00:00:00Z",45,
          "2008-01-01T00:00:00Z",13,
          "2009-01-01T00:00:00Z",5,
          "2010-01-01T00:00:00Z",1,
          "2011-01-01T00:00:00Z",0,
          "2012-01-01T00:00:00Z",0,
          "2013-01-01T00:00:00Z",2,
          "2014-01-01T00:00:00Z",0,
          "2015-01-01T00:00:00Z",1,
          "2016-01-01T00:00:00Z",0],
        "gap":"+1YEAR",
        "start":"1997-01-01T00:00:00Z",
        "end":"2017-01-01T00:00:00Z"}},
    "facet_intervals":{},
    "facet_heatmaps":{}}}
Pivot Facets
Another faceting type is pivot facets, also known as "decision trees", allowing two or more fields to be nested for all the various possible combinations.
Using the films data, pivot facets can be used to see how many of the films in the "Drama" category (the genre_str field) are directed by a director.
Here’s how to get at the raw data for this scenario:
curl "http://localhost:8983/solr/films/select?q=\*:*&rows=0&facet=on&facet.pivot=genre_str,directed_by_str"This results in the following response, which shows a facet for each category and director combination:
{"responseHeader":{
    "zkConnected":true,
    "status":0,
    "QTime":1147,
    "params":{
      "q":"*:*",
      "facet.pivot":"genre_str,directed_by_str",
      "rows":"0",
      "facet":"on"}},
  "response":{"numFound":1100,"start":0,"maxScore":1.0,"docs":[]
  },
  "facet_counts":{
    "facet_queries":{},
    "facet_fields":{},
    "facet_ranges":{},
    "facet_intervals":{},
    "facet_heatmaps":{},
    "facet_pivot":{
      "genre_str,directed_by_str":[{
          "field":"genre_str",
          "value":"Drama",
          "count":552,
          "pivot":[{
              "field":"directed_by_str",
              "value":"Ridley Scott",
              "count":5},
            {
              "field":"directed_by_str",
              "value":"Steven Soderbergh",
              "count":5},
            {
              "field":"directed_by_str",
              "value":"Michael Winterbottom",
              "count":4}}]}]}}}
We’ve truncated this output as well - you will see a lot of genres and directors in your screen.
Exercise 2 Wrap Up
In this exercise, we learned a little bit more about how Solr organizes data in the indexes, and how to work with the Schema API to manipulate the schema file. We also learned a bit about facets in Solr, including range facets and pivot facets. In both of these things, we’ve only scratched the surface of the available options. If you can dream it, it might be possible!
Like our previous exercise, this data may not be relevant to your needs. We can clean up our work by deleting the collection. To do that, issue this command at the command line:
bin/solr delete -c films