Exploring the Apache Solr Operator v0.3.0 on GKE
Author: Tim Potter
Earlier this year, Bloomberg graciously donated the Solr operator to the Apache Software Foundation. The latest v0.3.0 release is the first under Apache and represents a significant milestone for the Apache Solr community at large. The operator is Solr’s first satellite project that is managed by the Solr PMC but released independently of Apache Solr. The community now has a powerful vehicle to translate hard-earned lessons and best practices running Solr at scale into automated solutions on Kubernetes.
Introduction
In this post, I explore the v0.3.0 release from the perspective of a DevOps engineer needing to deploy a well-configured Solr cluster on Kubernetes.
The Solr operator makes getting started with Solr on Kubernetes very easy. If you follow the local tutorial, you can have a Solr cluster up and running locally in no time. However, for rolling out to production, three additional concerns come to mind: security, high-availability, and performance monitoring. The purpose of this guide is to help you plan for and implement these important production concerns.
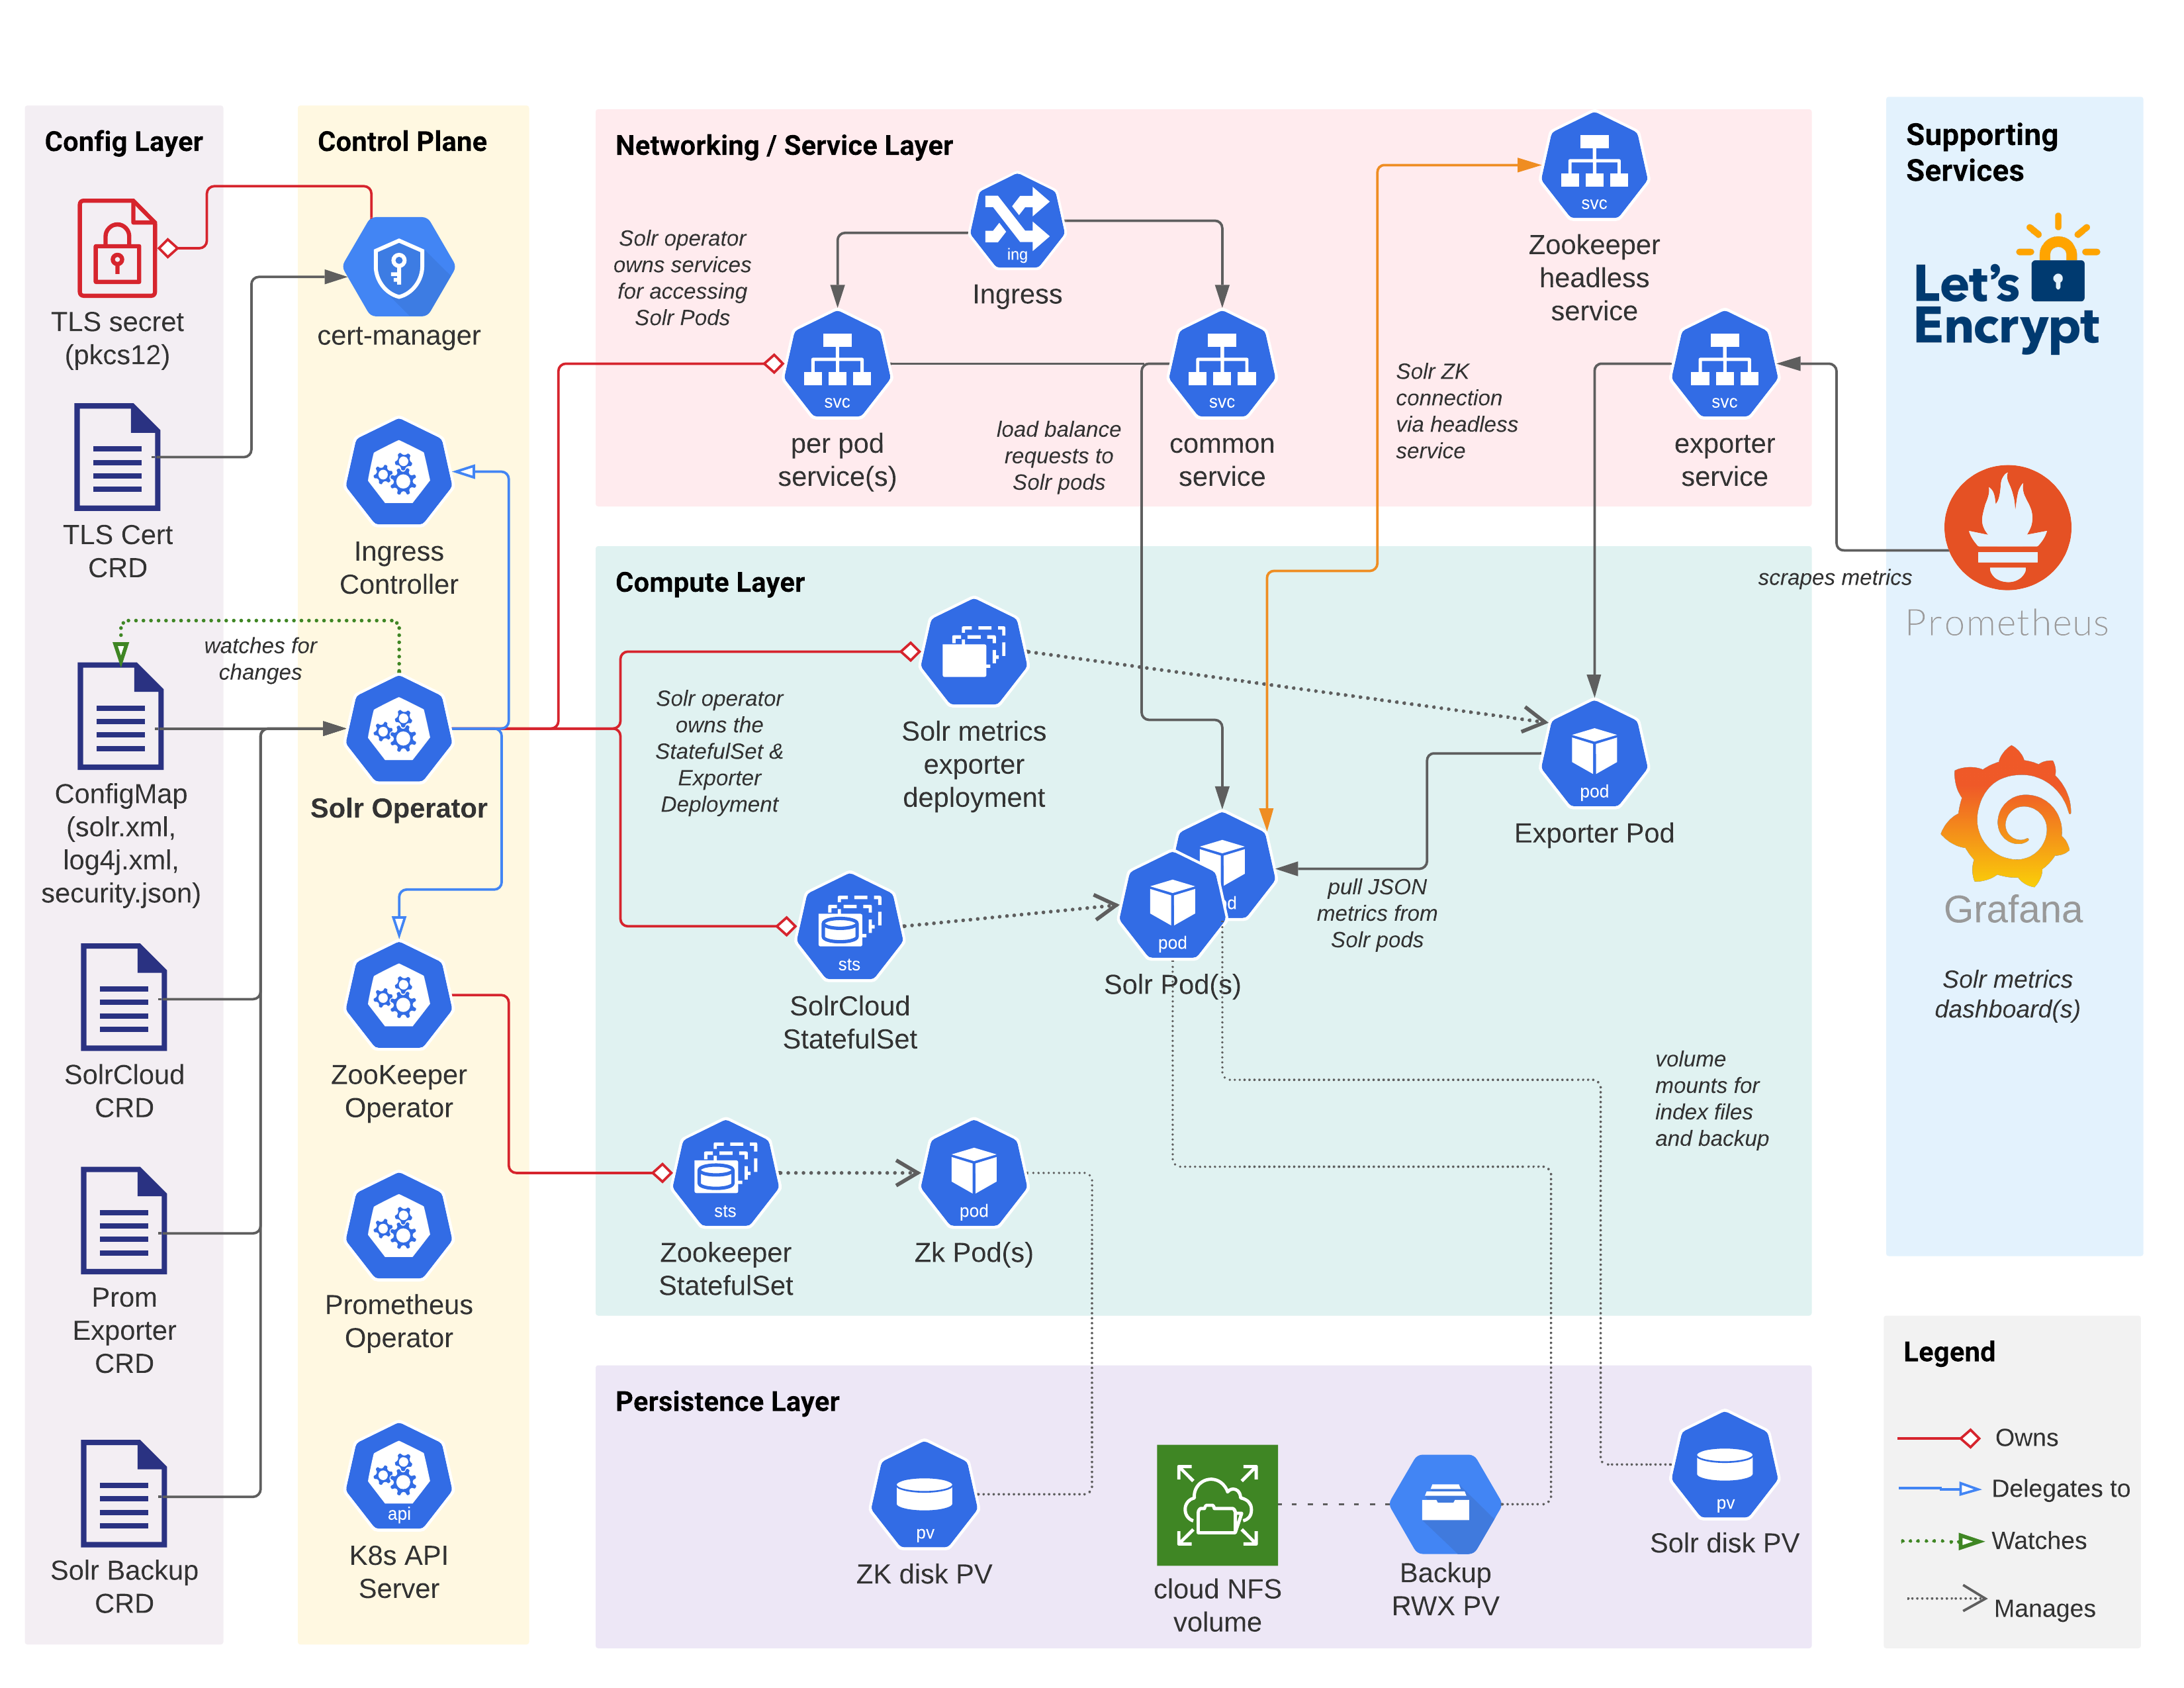
Before getting into the details, take a moment to review the diagram below, which depicts the primary components, configuration, and interactions for a Solr cluster deployed to Kubernetes by the operator. Of course there are many other Kubernetes objects at play (secrets, service accounts, and so on) but the diagram only shows the primary objects.
Getting Started
Let’s get a base deployment of the Solr operator, Solr cluster, and supporting services running on GKE. I have no formal affiliation with Google and am using GKE for this post because of its ease of use, but the same basic process will work on other cloud managed Kubernetes like Amazon’s EKS or AKS. We’ll improve on this initial configuration as we work through the sections of this document. At the end, we’ll have the CRD definitions and supporting scripts needed to run a production ready Solr cluster in the cloud.
Kubernetes Setup
I encourage you to follow along at home, so fire up a GKE cluster and open your terminal. If you’re new to GKE, work through the GKE Quickstart before proceeding with this document. To achieve better HA, you should deploy a regional GKE cluster across three zones (at least one Solr pod per zone). Of course, you can deploy a zonal cluster to one zone for dev / testing purposes but the examples I show are based on a 3-node GKE cluster running in the us-central1 region with one node in each of three zones.
To get started, we need to install the nginx ingress controller into ingress-nginx namespace:
kubectl apply -f https://raw.githubusercontent.com/kubernetes/ingress-nginx/controller-v0.45.0/deploy/static/provider/cloud/deploy.yaml
For more information, see Deploy Nginx Ingress on GKE.
To verify the ingress controller is operating normally, do:
kubectl get pods -l app.kubernetes.io/name=ingress-nginx -n ingress-nginx \
  --field-selector status.phase=Running
Should see expected output similar to:
NAME                                        READY   STATUS    RESTARTS   AGE
ingress-nginx-controller-6c94f69c74-fxzp7   1/1     Running   0          6m23s
For this document, we’re going to deploy the operator and Solr to a namespace named sop030:
kubectl create ns sop030
kubectl config set-context --current --namespace=sop030
Solr Operator Setup
If you installed previous versions of the Solr operator, then please upgrade to the Apache Solr version using these instructions: Upgrading to Apache. Otherwise, add the Apache Solr Helm repo, install the Solr CRDs and install the Solr operator:
helm repo add apache-solr https://solr.apache.org/charts
helm repo update

kubectl create -f https://solr.apache.org/operator/downloads/crds/v0.3.0/all-with-dependencies.yaml

helm upgrade --install solr-operator apache-solr/solr-operator \
  --version 0.3.0
At this point, verify you have a Solr operator pod running in your namespace:
kubectl get pod -l control-plane=solr-operator
kubectl describe pod -l control-plane=solr-operator
Notice I’m using a label selector filter instead of addressing the pods by ID, which saves me having to look up the ID to get pod details.
There should also be a Zookeeper Operator pod running in your namespace, verify using:
kubectl get pod -l component=zookeeper-operator
Solr CRDs
A Custom Resource Definition (CRD) allows application developers to define a new type of object in Kubernetes. This provides a number of benefits:
- Exposes domain specific config settings to human operators
- Reduce boilerplate and hide implementation details
- Perform CRUD operations on CRDs with kubectl
- Stored and managed in etcd just like any other K8s resource
The Solr operator defines CRDs that represent Solr specific objects, such as a SolrCloud resource, metrics exporter resource, and a backup/restore resource. The SolrCloud CRD defines the configuration settings needed to deploy and manage a Solr cluster in a Kubernetes namespace. First, let’s look at the SolrCloud CRD using kubectl:
# get a list of all CRDs in the cluster
kubectl get crds

# get details about the SolrCloud CRD Spec
kubectl explain solrclouds.spec
kubectl explain solrclouds.spec.solrImage

# get details about the SolrCloud CRD Status
kubectl explain solrclouds.status
Take a moment to look over the output from the explain command above; the various structures and fields should seem familiar.
Feel free to dig down, exploring different parts of the SolrCloud CRD Spec and Status.
Creating a Solr Cloud
To deploy an instance of a SolrCloud object in a Kubernetes namespace, we craft a bit of YAML, such as the example shown below:
apiVersion: solr.apache.org/v1beta1
kind: SolrCloud
metadata:
  name: explore
spec:
  customSolrKubeOptions:
    podOptions:
      resources:
        limits:
          memory: 3Gi
        requests:
          cpu: 700m
          memory: 3Gi
  dataStorage:
    persistent:
      pvcTemplate:
        spec:
          resources:
            requests:
              storage: 2Gi
      reclaimPolicy: Delete
  replicas: 3
  solrImage:
    repository: solr
    tag: 8.8.2
  solrJavaMem: -Xms500M -Xmx500M
  updateStrategy:
    method: StatefulSet
  zookeeperRef:
    provided:
      chroot: /explore
      image:
        pullPolicy: IfNotPresent
        repository: pravega/zookeeper
        tag: 0.2.9
      persistence:
        reclaimPolicy: Delete
        spec:
          accessModes:
          - ReadWriteOnce
          resources:
            requests:
              storage: 2Gi
      replicas: 3
      zookeeperPodPolicy:
        resources:
          limits:
            memory: 500Mi
          requests:
            cpu: 250m
            memory: 500Mi
Play close attention to the resource requests / limits and disk sizes for Solr and Zookeeper; allocating the correct amount of memory, CPU, and disk for each Solr pod is an essential task when designing your cluster. Of course with Kubernetes you can add more pods as needed, but you still need to estimate the correct resource requests / limits and disk size for your use case before deploying pods. Sizing for production is beyond the scope of this document and is very use-case specific (typically requiring some trial and error running realistic load tests).
What should stand out to you about the SolrCloud YAML is that most of the settings are very Solr specific and self-explantory if you've worked with Solr in the past. Your ops team will keep this YAML in source control, allowing them to automate the process of creating SolrCloud clusters in Kubernetes. You could even build a Helm chart to manage your SolrCloud YAML and related objects, such as backup/restore and Prometheus exporter CRD definitions.
Open a shell and run the following to tail the operator pod logs:
kubectl logs -l control-plane=solr-operator -f
Note that I’m using a label selector (-l ...) instead of addressing the pod by its ID; this alleviates having to find the pod ID every time I want to view the operator logs.
To deploy the explore SolrCloud to K8s, save the YAML shown above to a file named explore-SolrCloud.yaml and then run the following in another shell tab:
kubectl apply -f explore-SolrCloud.yaml
We'll make updates to the explore-SolrCloud.yaml file throughout the rest of this document.
Any code section that starts with "spec:", refers to this file.
When you submit this SolrCloud definition to the Kubernetes API server, it notifies the Solr operator (running as a pod in your namespace) using a watcher like mechanism.
This initiates a reconcile process in the operator where it creates the various K8s objects needed to run the explore SolrCloud cluster (see diagram above).
Take a brief look at the logs for the operator as the SolrCloud instance gets deployed.
One of the main benefits of CRDs is you can interact with them using kubectl just like native K8s objects:
$ kubectl get solrclouds

NAME     VERSION   TARGETVERSION   DESIREDNODES   NODES   READYNODES   AGE
explore  8.8.2                     3              3       3            73s

$ kubectl get solrclouds explore -o yaml
Behind the scenes, the operator created a StatefulSet for managing a set of Solr pods.
Take a look at the explore StatefulSet using:
kubectl get sts explore -o yaml
There's one slightly nuanced setting I'm relying on for this initial SolrCloud definition:
  updateStrategy:
    method: StatefulSet
We need to start with StatefulSet as the updateStrategy method so that we can enable TLS on an existing SolrCloud.
We'll switch this to Managed in the HA section after enabling TLS. Using Managed requires the operator to call the
collections API to get CLUSTERSTATUS which doesn't work while a cluster is converting from HTTP to HTTPs.
In a real deployment, you should just start with TLS enabled initially vs. upgrading to TLS on an existing cluster.
Also, let’s not create any collections or load data just yet as we want to lock down the cluster before moving forward.
Zookeeper Connection
Solr Cloud depends on Apache Zookeeper.
In the explore SolrCloud definition, I'm using the provided option, which means the Solr operator provides a Zookeeper ensemble for the SolrCloud instance.
Behind the scenes, the Solr operator defines a ZookeeperCluster CRD instance, which is managed by the Zookeeper operator.
The provided option is useful for getting started and development but does not expose all the configuration options supported by the Zookeeper operator.
For production deployments, consider defining your own ZookeeperCluster outside of the SolrCloud CRD definition and then simply pointing to the Zookeeper ensemble connection string using connectionInfo under spec.zookeeperRef.
This gives you full control over your Zookeeper cluster deployment, allows for multiple SolrCloud instances (and other applications) to share the same Zookeeper service (with different chroot of course), and provides a nice separation of concerns.
Alternatively, the Solr operator does not require using the Zookeeper operator, so you can use a Helm chart to deploy your Zookeeper cluster, if the Zookeeper operator does not meet your needs.
Custom Log4J Config
Before moving on, I wanted to point out a handy feature in the operator that allows you to load a custom Log4j config from a user-provided ConfigMap. I mention this feature because you may face a situation where you need to customize the Log4j config for Solr to help troubleshoot a problem in production. I won't go into the details here, but use the Custom Log Configuration documentation to configure your own custom Log4J config.
Security
Security should be your first and main concern at all times, especially when running in public clouds like GKE; you don’t want to be that ops engineer who’s system gets compromised. In this section we’re going to enable TLS, basic authentication, and authorization controls for Solr’s API endpoints. For a more detailed explanation of all configuration options, see the SolrCloud CRD documentation.
To enable TLS for Solr, all you need is a TLS secret containing a public X.509 certificate and a private key. The Kubernetes ecosystem provides a powerful tool for issuing and managing certificates: cert-manager. If not already installed in your cluster, follow the basic instructions provided by the Solr operator to get the latest version of cert-manager installed: Use cert-manager to issue the certificate.
Cert-manager and Let’s Encrypt
First, let’s get started with a self-signed certificate.
You’ll need to create a self-signed issuer (cert-manager CRD), certificate (cert-manager CRD), and a secret holding a keystore password.
Save the following yaml to a file, and apply it via kubectl apply -f.
---
apiVersion: v1
kind: Secret
metadata:
  name: pkcs12-keystore-password
stringData:
  password-key: Test1234

---
apiVersion: cert-manager.io/v1
kind: Issuer
metadata:
  name: selfsigned-issuer
spec:
  selfSigned: {}

---
apiVersion: cert-manager.io/v1
kind: Certificate
metadata:
  name: explore-selfsigned-cert
spec:
  subject:
    organizations: ["self"]
  dnsNames:
    - localhost
  secretName: explore-selfsigned-cert-tls
  issuerRef:
    name: selfsigned-issuer
  keystores:
    pkcs12:
      create: true
      passwordSecretRef:
        key: password-key
        name: pkcs12-keystore-password
Notice I requested a PKCS12 keystore to be generated for my certificate using:
  keystores:
    pkcs12:
      create: true
This is a nice feature of cert-manager when working with Java based applications as Java supports reading PKCS12 natively whereas you’d need to convert the tls.crt and tls.key files using keytool if cert-manager did not do this for you automatically.
Cert-manager creates a Kubernetes secret holding the X.509 certificate, private key, and PKCS12 compliant keystore used by Solr. Take a moment to inspect the contents of the secret using:
kubectl get secret explore-selfsigned-cert-tls -o yaml
Update your SolrCloud CRD definition in explore-SolrCloud.yaml to enable TLS and point to the secret holding the keystore:
spec:
  ...

  solrAddressability:
    commonServicePort: 443
    external:
      domainName: YOUR_DOMAIN_NAME_HERE
      method: Ingress
      nodePortOverride: 443
      useExternalAddress: false
    podPort: 8983

  solrTLS:
    restartOnTLSSecretUpdate: true
    pkcs12Secret:
      name: explore-selfsigned-cert-tls
      key: keystore.p12
    keyStorePasswordSecret:
      name: pkcs12-keystore-password
      key: password-key
Notice that I'm also exposing Solr externally via an Ingress and switching the common service port to 443, which is more intuitive when working with TLS enabled services. Apply your changes to the SolrCloud CRD using:
kubectl apply -f explore-SolrCloud.yaml
This will trigger a rolling restart of the Solr pods to enable TLS using your self-signed cert. Verify Solr is serving traffic over HTTPS by opening a port-forward to one of the Solr pods (port 8983) and then do:
curl https://localhost:8983/solr/admin/info/system -k
Let’s Encrypt Issued TLS Certs
Self-signed certificates are great for local testing but for exposing services on the Web, we need a certificate issued by a trusted CA. I’m going to use Let’s Encrypt to issue a cert for my Solr cluster for a domain I own. If you don't have a domain name for your Solr cluster, you can just skip this section and refer back to it when needed. The process I’m using here is based on the docs at: ACME DNS01 Resolver for Google.
Here’s the Let’s Encrypt issuer I created for my GKE environment:
---
apiVersion: cert-manager.io/v1
kind: Issuer
metadata:
  name: acme-letsencrypt-issuer
spec:
  acme:
    server: https://acme-v02.api.letsencrypt.org/directory
    email: *** REDACTED ***
    privateKeySecretRef:
      name: acme-letsencrypt-issuer-pk
    solvers:
    - dns01:
        cloudDNS:
          project: GCP_PROJECT
          serviceAccountSecretRef:
            name: clouddns-dns01-solver-svc-acct
            key: key.json

---
apiVersion: cert-manager.io/v1
kind: Certificate
metadata:
  name: explore-solr-tls-cert
spec:
  dnsNames:
  - YOUR_DOMAIN_NAME_HERE
  issuerRef:
    kind: Issuer
    name: acme-letsencrypt-issuer
  keystores:
    pkcs12:
      create: true
      passwordSecretRef:
        key: password-key
        name: pkcs12-keystore-password
  secretName: explore-solr-tls-letsencrypt
  subject:
    countries:
    - USA
    organizationalUnits:
    - k8s
    organizations:
    - solr
Creating a certificate issuer typically involves some platform specific configuration.
For GKE, notice I’m using the DNS01 resolver, which requires credentials for a service account that has DNS admin permission, which you’ll need to configure in your GCP console or using the gcloud CLI.
In my environment, I’m storing the credentials in a secret named: clouddns-dns01-solver-svc-acct.
You can tail the logs on the cert-manager pod (in the cert-manager namespace) to track the progress of the issuing process.
kubectl logs -l app.kubernetes.io/name=cert-manager -n cert-manager
Once the TLS cert is issued by Let's Encrypt, re-configure (assuming you worked through the self-signed process above) your SolrCloud instance to expose Solr via an Ingress and use the PKCS12 keystore holding the certificate and private key stored in the TLS secret created by cert-manager:
spec:
  ...

  solrTLS:
    pkcs12Secret:
      name: explore-solr-tls-letsencrypt
      key: keystore.p12
The final step is to create a DNS A record to map the IP address of your Ingress (created by the Solr operator) to the hostname for your Ingress.
mTLS
The Solr operator supports mTLS-enabled Solr clusters but is a bit beyond the scope of this document. Refer to the Solr Operator documentation for configuring mTLS.
Authentication & Authorization
If you followed the process in the previous section, then traffic on the wire between Solr pods is encrypted, but we also need to make sure incoming requests have a user identity (authentication) and the requesting user is authorized to perform the request.
As of v0.3.0, the Solr operator supports basic authentication and Solr’s rule based authorization controls.
The easiest way to get started is to have the operator bootstrap basic authentication and authorization controls. For detailed instructions, see: Authentication and Authorization
spec:
  ...

  solrSecurity:
    authenticationType: Basic
The operator configures credentials for three Solr users: admin, k8s-oper, and solr.
Login to the Solr admin Web UI as the admin user by doing:
kubectl get secret explore-solrcloud-security-bootstrap \
  -o jsonpath='{.data.admin}' | base64 --decode
At this point, all traffic into and between Solr pods is encrypted using TLS and API endpoints are locked down via Solr’s Rule-based authorization controls and basic authentication. Now that Solr is properly locked down, let’s move on to configuring our cluster for high availability (HA).
High Availability
In this section, we cover several key topics to achieving high availability for Solr pods in Kubernetes. Ensuring node availability is only part of the equation. You also need to ensure replicas for each shard of each collection that needs high availability are properly distributed across the pods so that losing a node or even an entire AZ will not result in a loss of service. However, ensuring some replicas remain online in the event of an outage only goes so far. At some point, the healthy replicas may become overloaded by requests, so any availability strategy you put in place also needs to plan for a sudden increase in load on the healthy replicas.
Pod Anti-Affinity
To begin our exploration of high availability with the Solr operator, let’s ensure Solr pods are evenly distributed around the cluster using pod anti-affinity.
Once you determine the number of Solr pods you need, you’ll also want to distribute the pods across your Kubernetes cluster in a balanced manner in order to withstand random node failures as well as zone-level outages (for multi-zone clusters) using Pod Anti-affinity rules.
To see the zones for each node in your cluster, do:
kubectl get nodes -L topology.kubernetes.io/zone
In the following podAntiAffinity example, pods that match the solr-cloud=explore label selector are distributed across different nodes and zones in the cluster.
Tip: The Solr operator sets the “solr-cloud” label to the name of your SolrCloud instance on all pods.
spec:
  ...

  customSolrKubeOptions:
    podOptions:
      affinity:
        podAntiAffinity:
          preferredDuringSchedulingIgnoredDuringExecution:
          - weight: 100
            podAffinityTerm:
              labelSelector:
                matchExpressions:
                - key: "technology"
                  operator: In
                  values:
                  - solr-cloud
                - key: "solr-cloud"
                  operator: In
                  values:
                  - explore
              topologyKey: topology.kubernetes.io/zone
          requiredDuringSchedulingIgnoredDuringExecution:
            - labelSelector:
                matchExpressions:
                - key: "technology"
                  operator: In
                  values:
                  - solr-cloud
                - key: "solr-cloud"
                  operator: In
                  values:
                  - explore
              topologyKey: kubernetes.io/hostname
Obviously this doesn't matter much when you have 3 nodes across 3 zones with 3 Solr pods, you'd get a balanced distribution with just the hostname anti-affinity rule; for large clusters, it's important to have rules for both hostnames and zones.
If you’re not running a multi-zone cluster, then you can remove the rule based on topology.kubernetes.io/zone.
Moreover, I think this rule should be a preference instead of a hard requirement so that Kubernetes can spin up replacement nodes and pods in other healthy zones if one zone is down.
Also, you may encounter pod scheduling issues when applying these anti-affinity rules for an existing SolrCloud because the underlying Persistent Volume Claims (PVC) used for the Solr disks are pinned to a zone.
Any Solr pods that move to another zone based on the new anti-affinity rule will leave the pod in a Pending state because the PVC that needs to be re-attached only exists in the original zone.
Thus, it's a good idea to plan your pod affinity rules before rolling out SolrCloud clusters.
If you need more Solr pods than available nodes in a cluster, then you should use preferredDuringSchedulingIgnoredDuringExecution instead of requiredDuringSchedulingIgnoredDuringExecution for the rule based on kubernetes.io/hostname. Kubernetes does its best to distribute pods evenly across nodes, but multiple pods will get scheduled on the same node at some point (obviously).
Assuming you requested 3 replicas for the “explore” SolrCloud, you should have an even distribution of pods across the three zones. Run the following command to get the number of unique nodes that your Solr Pods are running on, and count how many there are.
kubectl get po -l solr-cloud=explore,technology=solr-cloud \
  -o json | jq -r '.items | sort_by(.spec.nodeName)[] | [.spec.nodeName] | @tsv' | uniq | wc -l
Output should be: 3
You should employ a similar anti-affinity config for Zookeeper pods to distribute those across zones as well.
Zone Aware Replica Placement
Once your cluster’s pods are properly sized and distributed around the cluster to facilitate HA, you still need to ensure all replicas for the collections that require HA get placed in order to take advantage of the cluster layout. In other words, it doesn't do any good to distribute pods around the cluster to support HA if all the replicas for the same shard end up on the same node or zone. On the Solr side, a good rule to start with is to have replicas for the same shard prefer other hosts using:
{"node": "#ANY", "shard": "#EACH", "replica":"<2"},
See Solr Auto-scaling for more information about this another other types of rules.
If you're over-sharding your collections, i.e. total replicas > # of pods, then you may need to relax the count thresholds in the node-level auto-scaling rules.
NOTE: The Solr auto-scaling framework has been deprecated in 8.x and is removed in 9.x. However, the rules we’ll leverage for replica placement in this document are replaced by the AffinityPlacementPlugin available in 9.x, see: solr/core/src/java/org/apache/solr/cluster/placement/plugins/AffinityPlacementFactory.java for details.
For multi-AZ clusters, each Solr pod in a StatefulSet needs the availability_zone Java system property set, which is a unique label that identifies the zone for that pod. The availability_zone property can be used in an auto-scaling rule to distribute replicas across all available zones in the SolrCloud cluster.
{"replica":"#EQUAL", "shard":"#EACH", "sysprop.availability_zone":"#EACH"},
If the service account for your Solr pods has the get nodes permission, you can get the zone from the node metadata using the Downward API.
However, many admins are reluctant to give out this permission.
A GCP specific solution where we curl the http://metadata.google.internal/computeMetadata/v1/instance/zone API is shown below:
spec:
  ...

  customSolrKubeOptions:
    podOptions:
      initContainers: # additional init containers for the Solr pods
        - name: set-zone # GKE specific, avoids giving get nodes permission to the service account
          image: curlimages/curl:latest
          command:
            - '/bin/sh'
            - '-c'
            - |
              zone=$(curl -sS http://metadata.google.internal/computeMetadata/v1/instance/zone -H 'Metadata-Flavor: Google')
              zone=${zone##*/}
              if [ "${zone}" != "" ]; then
                echo "export SOLR_OPTS=\"\${SOLR_OPTS} -Davailability_zone=${zone}\"" > /docker-entrypoint-initdb.d/set-zone.sh
              fi
          volumeMounts:
            - name: initdb
              mountPath: /docker-entrypoint-initdb.d
      volumes:
      - defaultContainerMount:
          mountPath: /docker-entrypoint-initdb.d
          name: initdb
        name: initdb
        source:
          emptyDir: {}
Notice the initContainer adds the set-zone.sh script to /docker-entrypoint-initdb.d.
The Docker Solr framework sources any scripts in this directory before starting Solr.
A similar approach could be applied for EKS (see output from http://169.254.169.254/latest/dynamic/instance-identity/document).
Of course using a platform specific approach isn’t ideal, but neither is having to grant get nodes permission.
The key is getting the availability_zone system property set using whatever approach works for your system.
You also need to ensure distributed queries prefer other replicas in the same zone using the node.sysprop shardPreference, added in Solr 8.2.
This query routing preference also helps reduce queries that span across zones when both zones are healthy.
For more detail, consult the Solr Ref Guide - Shard Preferences
I’ll leave it as an exercise for the reader to apply an auto-scaling policy that uses the availability_zone system property to influence replica placement.
Replica Types
If you use the operator to deploy multiple SolrCloud instances, but they all use the same Zookeeper connection string (and chroot), then it behaves like a single Solr Cloud cluster from a Solr perspective.
You can use this approach to assign Solr pods to different nodes in your Kubernetes cluster.
For instance, you may want to run TLOG replicas on one set of nodes and PULL replicas on another set to isolate write and read traffic
(see: Replica Types).
Isolating traffic by replica type is beyond the scope of this document, but you can use the operator to deploy multiple SolrCloud instances to achieve the isolation.
Each instance will need a Java system property set, such as solr_node_type, to differentiate the Solr pods from each other; Solr’s auto-scaling policy engine supports assigning replicas by type using a System property.
Rolling restarts
One of the major benefits of an operator is we can extend Kubernetes default behavior to take into account application specific state.
For instance, when performing a rolling restart of a StatefulSet, K8s will start with the pod with the highest ordinal value and work down to zero, waiting in between for the restarted pod to reach the Running state.
While this approach works, it’s typically too slow for large clusters, and could possibly be harmful without knowledge of whether replicas on that node are recovering.
In contrast, the operator enhances the rolling restart operation for StatefulSets to give consideration for which Solr pod hosts the Overseer (restarted last), number of leaders on a pod, and so on. The result is an optimized rolling restart process for SolrCloud where multiple pods can be restarted concurrently. The operator uses Solr’s cluster status API to ensure at least one replica for every shard* is online when deciding which pods to restart concurrently. What’s more, these custom reconcile processes adhere to the idea of idempotency that is so important in Kubernetes. The reconcile can be called 100 times given the same starting state, the results should be identical from the 1st and 100th.
Recall that I originally used the StatefulSet method so that we could migrate an existing cluster to use TLS.
Let's switch that to use the Managed method using the following config:
spec:
  ...

  updateStrategy:
    managed:
      maxPodsUnavailable: 2
      maxShardReplicasUnavailable: 2
    method: Managed
Add this to your explore-SolrCloud.yaml and apply the changes.
* As you see above, the Managed update strategy is customizable and can be configured to be as safe or as fast as you require.
See the update documentation for more information.
Performance Monitoring
So now we have a secured, HA-capable Solr cluster, deployed and managed by the Solr operator. This last piece I want to cover is performance monitoring with the Prometheus stack.
Prometheus Stack
You’re probably already using Prometheus for monitoring but if not installed in your cluster, use the installation instructions to install the Prometheus stack which includes Grafana.
Prometheus Exporter
The operator documentation covers how to deploy a Prometheus exporter for your SolrCloud instance. Since we enabled basic auth and TLS, you’ll need to ensure the exporter can talk to the secured Solr pods using the following config settings:
 solrReference:
    cloud:
      name: "explore"
    basicAuthSecret: explore-solrcloud-basic-auth
 solrTLS:
    restartOnTLSSecretUpdate: true
    pkcs12Secret:
      name: explore-selfsigned-cert-tls
      key: keystore.p12
    keyStorePasswordSecret:
      name: pkcs12-keystore-password
      key: password-key
Make sure the pkcs12Secret.name is correct depending on whether you're using the self-signed cert or one issued by another CA such as Let's Encrypt.
Ensure the service the Prometheus operator scrapes metrics from is correct:
kubectl get svc -l solr-prometheus-exporter=explore-prom-exporter
If this shows a healthy service, then create a service monitor
to trigger Prometheus to start scraping metrics from the exporter pod via the explore-prom-exporter-solr-metrics service.
apiVersion: monitoring.coreos.com/v1
kind: ServiceMonitor
metadata:
  name: solr-metrics
  labels:
    release: prometheus-stack
spec:
  selector:
    matchLabels:
      solr-prometheus-exporter: explore-prom-exporter
  namespaceSelector:
    matchNames:
    - sop030
  endpoints:
  - port: solr-metrics
    interval: 15s
You'll need at least one collection created in your cluster before the exporter starts generating useful metrics.
Grafana Dashboards
Use kubectl expose to create a LoadBalancer (external IP) for Grafana:
kubectl expose deployment prometheus-stack-grafana --type=LoadBalancer \
   --name=grafana -n monitoring
After waiting a bit, get the external IP address for the grafana service by doing:
kubectl -n monitoring get service grafana \
  -o jsonpath='{.status.loadBalancer.ingress[0].ip}'
Alternatively, you can just open a port-forward to the Grafana pod listening on port 3000.
Login to Grafana using admin and prom-operator
Download the default Solr dashboard from the source distribution:
wget -q -O grafana-solr-dashboard.json \
  "https://raw.githubusercontent.com/apache/lucene-solr/branch_8x/solr/contrib/prometheus-exporter/conf/grafana-solr-dashboard.json"
Manually import the grafana-solr-dashboard.json file into Grafana.
At this point, you should load some data and run query performance tests. If you’re running a multi-zone cluster, then be sure to add the following query parameter to your query requests to prefer replicas in the same zone (which helps cut down on cross-zone traffic per request when all zones have healthy replicas). If you don’t have a query load test tool, then I recommend looking at Gatling (gatling.io).
shards.preference=node.sysprop:sysprop.availability_zone,replica.location:local
Wrap-up
At this point, you now have a blueprint for creating a secure, HA-capable, balanced Solr cluster with performance monitoring via Prometheus and Grafana. Before rolling out to production, you also need to consider backup/restore, automated scaling, and alerting for key health indicators. Hopefully I’ll be able to cover some of these additional aspects in a future post.
Have other concerns you want more information about? Let’s us know, we’re on slack #solr-operator or via GitHub Issues.
Here’s a final listing of the SolrCloud, Prometheus Exporter, and supporting objects YAML I used in this post. Enjoy!
---
apiVersion: v1
kind: Secret
metadata:
  name: pkcs12-keystore-password
stringData:
  password-key: Test1234

---
apiVersion: cert-manager.io/v1
kind: Issuer
metadata:
  name: selfsigned-issuer
spec:
  selfSigned: {}

---
apiVersion: cert-manager.io/v1
kind: Certificate
metadata:
  name: explore-selfsigned-cert
spec:
  subject:
    organizations: ["self"]
  dnsNames:
    - localhost
  secretName: explore-selfsigned-cert-tls
  issuerRef:
    name: selfsigned-issuer
  keystores:
    pkcs12:
      create: true
      passwordSecretRef:
        key: password-key
        name: pkcs12-keystore-password

---
apiVersion: solr.apache.org/v1beta1
kind: SolrCloud
metadata:
  name: explore
spec:
  customSolrKubeOptions:
    podOptions:
      resources:
        limits:
          memory: 3Gi
        requests:
          cpu: 700m
          memory: 3Gi
      affinity:
        podAntiAffinity:
          preferredDuringSchedulingIgnoredDuringExecution:
          - weight: 100
            podAffinityTerm:
              labelSelector:
                matchExpressions:
                - key: "technology"
                  operator: In
                  values:
                  - solr-cloud
                - key: "solr-cloud"
                  operator: In
                  values:
                  - explore
              topologyKey: topology.kubernetes.io/zone
          requiredDuringSchedulingIgnoredDuringExecution:
            - labelSelector:
                matchExpressions:
                - key: "technology"
                  operator: In
                  values:
                  - solr-cloud
                - key: "solr-cloud"
                  operator: In
                  values:
                  - explore
              topologyKey: kubernetes.io/hostname
      initContainers: # additional init containers for the Solr pods
        - name: set-zone # GKE specific, avoids giving get nodes permission to the service account
          image: curlimages/curl:latest
          command:
            - '/bin/sh'
            - '-c'
            - |
              zone=$(curl -sS http://metadata.google.internal/computeMetadata/v1/instance/zone -H 'Metadata-Flavor: Google')
              zone=${zone##*/}
              if [ "${zone}" != "" ]; then
                echo "export SOLR_OPTS=\"\${SOLR_OPTS} -Davailability_zone=${zone}\"" > /docker-entrypoint-initdb.d/set-zone.sh
              fi
          volumeMounts:
            - name: initdb
              mountPath: /docker-entrypoint-initdb.d
      volumes:
      - defaultContainerMount:
          mountPath: /docker-entrypoint-initdb.d
          name: initdb
        name: initdb
        source:
          emptyDir: {}

  dataStorage:
    persistent:
      pvcTemplate:
        spec:
          resources:
            requests:
              storage: 2Gi
      reclaimPolicy: Delete
  replicas: 3
  solrImage:
    repository: solr
    tag: 8.8.2
  solrJavaMem: -Xms500M -Xmx510M
  updateStrategy:
    managed:
      maxPodsUnavailable: 2
      maxShardReplicasUnavailable: 2
    method: Managed

  solrAddressability:
    commonServicePort: 443
    external:
      domainName: YOUR_DOMAIN_NAME_HERE
      method: Ingress
      nodePortOverride: 443
      useExternalAddress: false
    podPort: 8983

  solrTLS:
    restartOnTLSSecretUpdate: true
    pkcs12Secret:
      name: explore-selfsigned-cert-tls
      key: keystore.p12
    keyStorePasswordSecret:
      name: pkcs12-keystore-password
      key: password-key

  solrSecurity:
    authenticationType: Basic

  zookeeperRef:
    provided:
      chroot: /explore
      image:
        pullPolicy: IfNotPresent
        repository: pravega/zookeeper
        tag: 0.2.9
      persistence:
        reclaimPolicy: Delete
        spec:
          accessModes:
          - ReadWriteOnce
          resources:
            requests:
              storage: 2Gi
      replicas: 3
      zookeeperPodPolicy:
        resources:
          limits:
            memory: 500Mi
          requests:
            cpu: 250m
            memory: 500Mi

---
apiVersion: solr.apache.org/v1beta1
kind: SolrPrometheusExporter
metadata:
  labels:
    controller-tools.k8s.io: "1.0"
  name: explore-prom-exporter
spec:
  customKubeOptions:
    podOptions:
      resources:
        requests:
          cpu: 300m
          memory: 800Mi
  solrReference:
    cloud:
      name: "explore"
    basicAuthSecret: explore-solrcloud-basic-auth
    solrTLS:
      restartOnTLSSecretUpdate: true
      pkcs12Secret:
        name: explore-selfsigned-cert-tls
        key: keystore.p12
      keyStorePasswordSecret:
        name: pkcs12-keystore-password
        key: password-key
  numThreads: 6
  image:
    repository: solr
    tag: 8.8.2

---
apiVersion: monitoring.coreos.com/v1
kind: ServiceMonitor
metadata:
  name: solr-metrics
  labels:
    release: prometheus-stack
spec:
  selector:
    matchLabels:
      solr-prometheus-exporter: explore-prom-exporter
  namespaceSelector:
    matchNames:
    - sop030
  endpoints:
  - port: solr-metrics
    interval: 15s